Sweet

Things Needed:
Tube of choice
MuRa's Copies Filter
My Supplies - Do Not Use In Any Other Tut or The Making Of One
Animation Shop
Ok here we go...
Open up the rose tube
Canvas size 700x700
Leave the rose in the center and use your Copies filter at these settings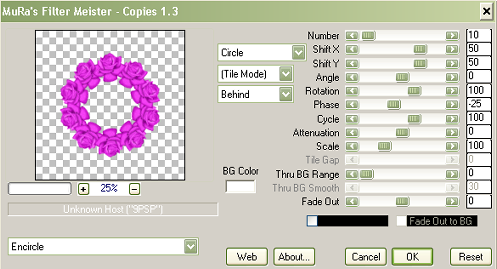
Now you should have a nice frame of flowers
Use your Mannual Color Correction to change the color of the rose
My source is #b40fb4 and my target is f578ba but feel free to change it to your liking
Copy and paste your rose again as a new layer
Use your copies filter again but this time change the Number to 6 or something that you like
You can change the color if you like but i left mine
Ok i wasnt happy with the size of the flower frame so i clicked on each layer and i used my deformation tool and stretched it out a bit
You do not have to but if you do make sure you sharpen each layer after your done
Be on your first flower layer. Mine is the pink flowers
Use your wand to click the center
Modify - Expand by 6
Fill with a color
Select None
Now you can add your favorite texture to it. I just added a texture from PSP
Add your tube and move into place. Erase parts you dont want to show if you like
Add your name and credits and final touches then we will prepare to animate
Alright, now to get ready to animate
Duplicate the second layer of flowers (mine is the purple ones) 2 times. So you have the original layer and 2 duplicated
X'out the two duplicated for the moment
On the original layer apply some noise. Enough to see it
X'out this layer and Un-x the first duplicated layer
Add noise to this layer but change the percentage
X'out this layer and un-x the second duplicate
Add noise to this but change the percentage again
ok un-x the original layer and keep the duplicates closed
Be on the top most layer and merge visible
Copy and paste as a New Image. This will get rid of the excess. Resize as needed
Copy and paste into animation shop
Back to PSP
Close the original layer and un-x the first duplicate
Be on the top most layer and merge visible
Copy and paste as a New Image. Resize as needed but make sure you resize the same percent that you just did
Copy and paste into animation shop After Current Frame
Back to PSP
Close the duplcate layer and un-x the second duplicate
Be on the top most layer and merge visible
Copy and paste as a New Image. Resize as needed but make sure you resize the same percent that you just did
Copy and paste into animation shop After Current Frame
View animation to make sure its to your liking
Save and your done!